0.79.0 release notes
Release date: 2022-09-19
How to upgrade
Download and launch the latest version:
- Linux (or Steam on Linux)
- Windows
- macOS
At theZ:\> prompt, run config -wc to write the new configuration file. Any
existing settings will be retained, however, extraneous comments will be
dropped.
What you can expect
-
It should run everything that prior versions did.
-
The default settings will give you improved audio, refined graphical scaling and colour accuracy, more robust mouse handling, and a more usable shell.
-
There are new and some deprecated config settings: your console log will inform you with orange-coloured warning messages to help you.
-
For performance-demanding games that use
maxcycles, it should provide just as much performance (or a bit more) than prior versions. -
International users: it should detect your language and keyboard layout on startup. We recommend reading the Localisation section for details.
-
Repo packagers: learn about bundled resource files and the updated Meson build settings.
Read on for all the details!
Audio improvements
AdLib Gold Surround Module emulation
The ultra-rare AdLib Gold surround sound daughterboard is now emulated, which makes it possible to finally enjoy the Dune soundtrack in its full glory! That’s the only game in existence that makes use of the surround module.
The following config is recommended for Dune. The setup utility should auto-detect AdLib Gold and the surround module correctly with these settings.
Sound card output filter emulation
Most DOS-era sound cards feature an output low-pass filter (and sometimes a high-pass filter too) that play an important role in giving their sound its character. DOSBox Staging can now accurately emulate these analog output stage filters for all supported sound devices.
Sound Blaster
For backward compatibility reasons, the sb_filter config parameter defaults
to the newly introduced modern filter, which uses the simple linear
interpolation method of previous DOSBox versions. To turn on accurate analog
output filter emulation, set the sb_filter to auto. This will set the
correct filters for each Sound Blaster model depending on the sb_type value.
You can also set a model-specific filter manually if you wish, e.g. this is
how to use a Sound Blaster 16 but with Sound Blaster Pro filters:
Some Sound Blaster models can toggle the filter on and off in software; you
can force the filter to be always on by setting sb_filter_always_on to
true.
OPL and CMS filters are also accurately emulated; please refer to the
descriptions of the opl_filter and cms_filter config parameters for
further details.
Small-speaker systems
Filters are enabled by default for all small-speaker audio systems (PC Speaker, PS/1 Audio, Tandy, and the various LPT DAC options). Depending on the particular device, these filters either emulate the analog output filters of the original device, or the sound coming out of a small band-limited speaker in an acoustic environment. Either way, the result is a more period-accurate and pleasant listening experience, especially on headphones.
Small-speaker filters are controlled by the following config parameters:
lpt_dac_filterpcspeaker_filterps1audio_dac_filterps1audio_filtertandy_dac_filtertandy_filter
Custom filters
Advanced users can specify custom filter settings for any of the supported sound devices. You can specify either a high-pass filter, a low-pass filter, or both at the same time using the following format
TYPE ORDER FREQ [TYPE ORDER FREQ]
where TYPE can be hpf (high-pass) or lpf (low-pass), ORDER is the
order of the filter from 1 to 16 (1st order results in a 6dB per octave slope,
2nd order in a 12dB per octave slope, etc.), and FREQ is the filter’s
cutoff frequency in Hz.
For example, to use a 2nd order (12dB/oct) low-pass filter at 8 kHz for the Sound Blaster:
To use a 3rd order (18dB/oct) high-pass filter at 120 Hz, and a 1st order (6dB/oct) low-pass filter at 6.5 kHz for the PC Speaker:
In addition to the sound devices mentioned above, you can use custom filters even with devices that don’t filter the output in the original hardware (e.g. GUS, MT-32), and the FluidSynth virtual MIDI device via the following config parameters:
fsynth_filtergus_filterinnovation_filtermt32_filter
Crossfeed
Listening to audio material on headphones where certain sounds are only present in either the left or the right channel can be a rather distracting and unpleasant experience. This is most noticeable on certain Dual OPL game soundtracks and tracker music (e.g. MOD, XM, S3M, IT, etc.)
The new crossfeed feature remedies that; by enabling crossfeed in the
[mixer] section, a certain percentage of the left channel is mixed into the
right, and vice versa. The default crossfeed strength is 40% which is a good
general setting, but you can provide a custom percentage value as well (e.g.
crossfeed = 55).
The amount of crossfeed can be fine-tuned per individual channels via mixer
commands; please type MIXER /? in the DOSBox prompt for further details.
Reverb and chorus
Reverb
One of the most exciting new audio features is the ability to add reverb (the emulation of real acoustic spaces) and chorus effects to any mixer channel. This can add a lot of atmosphere to dry-sounding synth soundtracks (typically OPL music) and elevate them to a whole new level! Enabling reverb and chorus processing is especially useful for headphone-listening.
The quickest way to enable the reverb effect globally is to put reverb =
on in the [mixer] config section. This will add reverb to all synth
channels (e.g. PC Speaker, OPL, CMS), and a lesser amount to digital audio
channels (e.g. Sound Blaster, GUS). While the default setting works well with
most games, it’s highly recommended to experiment with the five available
reverb presets to find the optimal setting for each game:
-
tinysimulates the sound of a small integrated speaker in a domestic room. This preset is specifically tailored for small-speaker audio systems (PC Speaker, Tandy, PS/1 Audio, and LPT DAC devices). -
smalladds a subtle sense of space; it’s best suited for games that use a single synth (typically OPL) for both the music and the sound effects. -
mediumis the default preset; it’s a middle-of-the-road setting that works well with a wide variety of games. -
largeis a large hall-style reverb that is recommended for games that use separate audio channels for music and digital audio (e.g. OPL audio and Sound Blaster digital sound.) -
hugeis a stronger variant of the large hall preset which is ideal for slower-paced, atmospheric music.
Chorus
Another way to add a sense of space to the sound is by enabling the chorus
effect. This adds stereo movement and increases the perceived stereo width,
which is especially noticeable on purely mono signals on headphones (e.g. PC
Speaker or OPL2 music). To enable it, just put chorus = on into the
[mixer] config section, or select one of the three predefined chorus
strength presets (light, normal, and strong).
Similarly to crossfeed, per-channel reverb and chorus settings can be tweaked
by mixer commands; please type MIXER /? in the DOSBox prompt for details.
Audio examples
Naturally, you can combine chorus and reverb, and it’s not only possible to do so, but highly recommended for achieving the best results! The below recordings showcase how crossfeed, reverb, chorus, and output stage filters can work in tandem to give old DOS game soundtracks a new life.
The exact settings used for these recordings are documented on the wiki, along with suggested audio configs for many other games. Make sure to check them out and experiment with the settings yourself! 😎 🔉 🎧
Alone in the Dark (1992, floppy version) — introduction
| Game | Type | Audio example |
|---|---|---|
| Alone in the Dark (floppy version) |
OPL2 | |
| Warcraft: Orcs & Humans | OPL3 | |
| Dungeon Master II: The Legend of Skullkeep |
Dual OPL2 | |
| Ultima Underworld I: The Stygian Abyss | Dual OPL2 | |
| Elvira: Mistress of the Dark | Dual OPL2 | |
| Skate or Die! | Tandy | |
| Zak McKracken and the Alien Mindbenders | Tandy | |
| Budokan: The Martial Spirit | CMS | |
| The Secret of Monkey Island | CMS |
Master compressor
An auto-levelling dynamic range compressor has been introduced to the master
channel to ensure that the audio output never gets distorted, no matter how
high the volume levels are. This is on by default and is virtually transparent
when the output is not driven into clipping. However, purists can disable it
by setting compressor to off, and then ensure correct non-clipping output
levels manually.
General mixer improvements
-
The mixer now uses a full 32-bit floating-point processing path internally, which means you can no longer overload individual mixer channels into clipping by using high per-channel volume settings. As long as the summed master output is not clipping, it’s guaranteed that nothing else will.
-
A fixed high-pass filter at 20 Hz has been introduced right before the final output that gets rid of any DC-offset and subsonic rumble globally.
-
The
MIXERcommand has received an overhaul too. First of all, the status output looks better, and the following improvements have been made:-
Now you can set reverb, chorus, and crossfeed levels per mixer channel; type
MIXER /?in the DOSBox prompt for further details. -
The
FMchannel has been renamed toOPL. -
The
SPKRchannel has been renamed toPCSPEAKER. -
The sample rate column has been removed (it served no useful purpose, and the displayed values were often technically correct but misleading).
-
-
For a high-level overview of the new mixer architecture, please refer to this diagram.
“One OPL mode to rule them all” 💍
NukedOPL has long been the default OPL mode in Staging. As it’s basically a bit-perfect emulation of the Yamaha YMF262 OPL3 chip, and it runs fast enough even on low-end hardware such as the Raspberry Pi 4, all other less accurate OPL emulation modes have been removed.
FluidSynth configuration changes
FluidSynth Reverb and Chorus
Due to the introduction of the new mixer-level reverb and chorus
effects, the FluidSynth reverb and chorus config
parameters have been renamed to fsynth_reverb and fsynth_chorus,
respectively.
To maintain backward compatibility with existing configurations, the
FluidSynth reverb and chorus effects are enabled by default, so all your
SoundFonts will sound just like in previous DOSBox versions. If you enable the
mixer-level reverb (or chorus) as well (e.g. by putting reverb = on in the
[mixer] section), you would get a second round of reverb (or chorus)
processing on the FluidSynth output. This is by design as it allows users the
greatest level of control over customising SoundFonts (e.g. some would sound
best with the FluidSynth reverb only, some with both, etc.)
Note
In the SF2 format the reverb and chorus amounts are specified on a per-instrument basis, while the mixer-level effects are applied “globally” to all instruments in the summed FluidSynth output. Therefore, what works best really depends on the particular SoundFont in question and on individual user preference (see this discussion for further technical details).
Volume Scaling
Previously, it was possible to specify a percentage after the SoundFont’s name
in the config to adjust its volume (e.g. soundfont = way_too_loud.sf2 30).
This was introduced as a workaround for certain loud SoundFonts that tended to
clip the mixer channel internally.
With the new floating-pointing mixer signal path, it’s no longer possible to
drive any of the mixer channels into clipping, therefore this workaround has
been deprecated. Please use standard mixer commands to lower the volume of the
FSYNTH channel if you wish to do so.
ripa’s PC speaker patch
We’ve integrated ripa’s impulse-model PC speaker patch alongside DOSBox’s existing (discrete-model) PC speaker implementation, which is still the default.
To use it, set the pcspeaker config setting to impulse (or go back to
default with discrete).
James-F and VileRancour have mentioned in the linked thread that it generally improves the accuracy of square-wave effects, such as in Commander Keen and Duke Nukem (2D). This patch also can produce sounds when none previously existed, such as in Wizball, as noted by ripsaw8080.
For example, here’s Wizball using the settings below:
Wizball (1987) — using discrete PC speaker emulation
Note
There are some audible regressions and harmonics that still exist in some games, so that’s why this is an alternative and not the default.
Parallel port DAC models: Disney, Covox, and Stereo-On-1
Those familiar with DOSBox know that these three devices are emulated with the
universal disney = true setting.
Like sbtype, we wanted the model of LPT DAC to be configurable, and so
Staging’s deprecated the disney setting in favour of lpt_dac that takes
any of the following:
disney, for the Disney Sound Sourcecovox, for the Covox Speech Thingston1, for the Stereo-on-1 DAC deviceoff/none, to disable the DAC (default)
This is paired with a corresponding filter setting, lpt_dac_filter, which
approximates how the original device sounded. This means that the Disney Sound
Source (which included a little speaker inside it) will sound a lot like you
might remember.
lpt_dac |
Examples (ModPlay Pro & Star Control II’s 8-bit Pkunk MOD) |
|---|---|
disney |
|
covox |
|
ston1 |
Like the other audio filters settings, the lpt_dac_filter can be toggled on,
off, or customised.
Audio mute and pause
The audio stream can now be manually muted with Ctrl+F8 (or Cmd+F8 on macOS).
You can also mute the audio automatically when DOSBox Staging goes to the background with this config setting:
Or you can pause emulation entirely when in the background with:
Graphical improvements
Shader reload shortcut
As DOSBox Staging currently lacks a shader preset system, tweaking shader parameters can only be accomplished by making changes to the shader source files themselves. Previously, you had to restart DOSBox to see the effects of such changes, which made fine-tuning shaders quite cumbersome, to say the least.
Now you can just use the Ctrl+F2 shortcut (Cmd+F2 on macOS) to reload the current shader at any time. Progress! 😎
CGA palette override
Now it is possible to override the default, canonical interpretation of the 16-colour CGA/EGA RGBI palette. The feature overrides the CGA colours in any CGA/EGA-like mode, so it even works in CGA/EGA modes with an emulated VGA or TGA (Tandy) graphics adapter.
Several presets have been included (e.g. Amiga and Atari ST colours for Sierra
games, and various CGA/EGA monitor emulations), and you can specify custom
palettes as well. Make sure to check out the description of the cga_colors
config parameter for the list of available presets (you can read more about
them
here).
Defender of the Crown
tandy-warm emulates the colours as they appear on an actual Tandy monitor,
which results in more subdued and pleasant colours. This is especially
apparent on the greens.
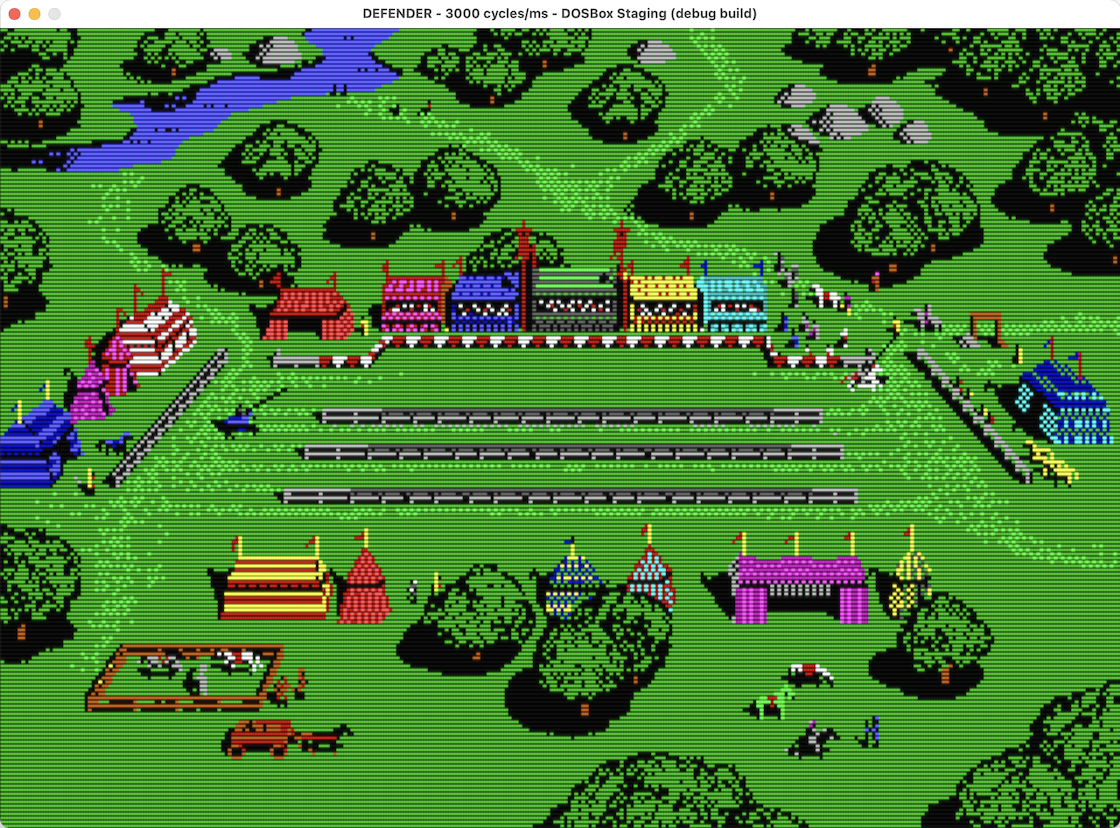
cga_colors = default
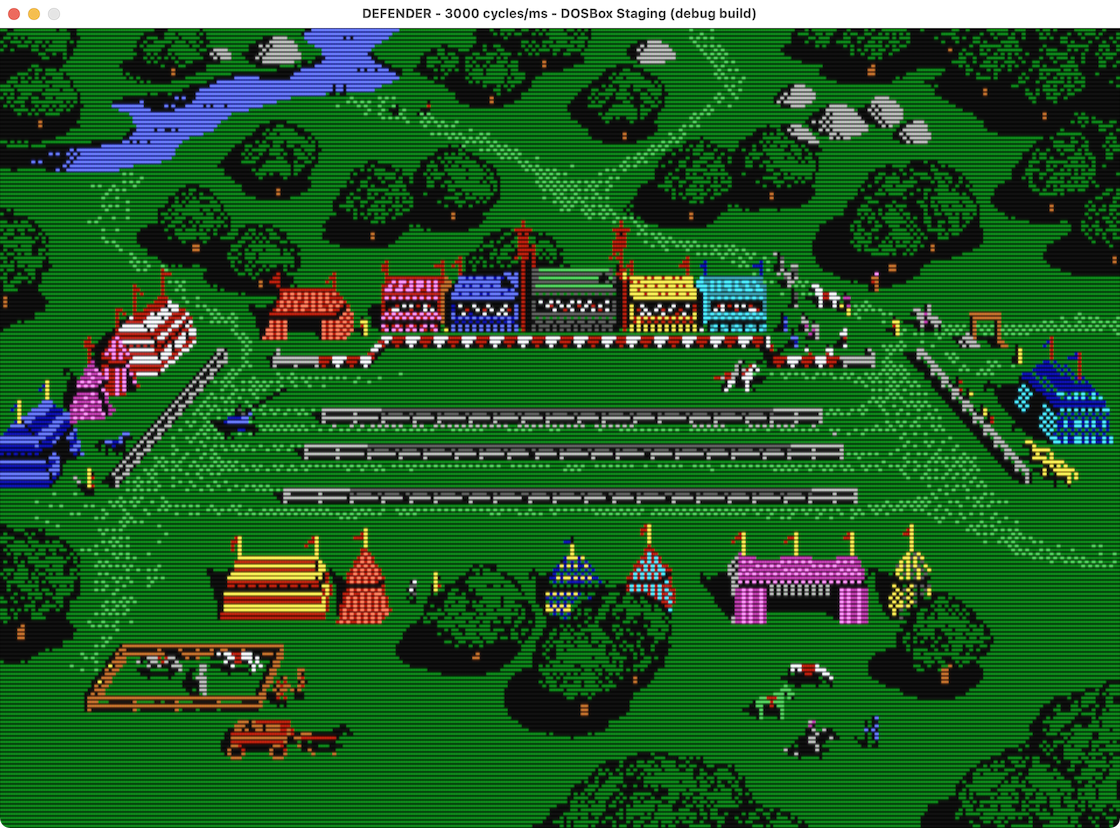
cga_colors = tandy-warm
Gold Rush
The Amiga/Atari ST ports of Sierra AGI games feature a tweaked CGA palette with improved skin tones and sky colours.

cga_colors = default
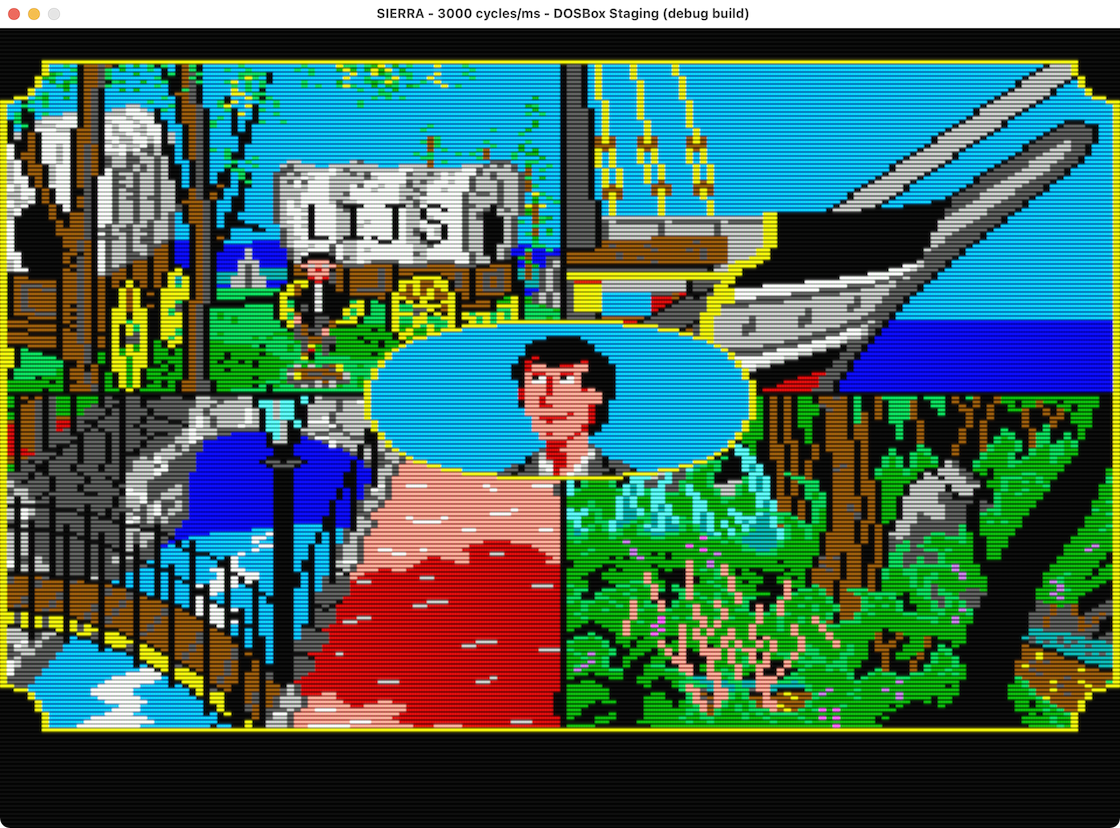
cga_colors = agi-amigaish
Zak McKracken and the Alien Mindbenders
Now you can play the PC version of this classic adventure with Tandy sound and Commodore 64 colours!

cga_colors = default

cga_colors = colodore
Scaled image quality improvements
When the image is scaled by non-integer ratios (e.g. when aspect correction is
enabled with the default sharp OpenGL shader), previously the interpolation
was performed in a gamma-incorrect way, leading to various unwanted artifacts.
These were most noticeable on checkerboard dither patterns (used frequently in
EGA games), appearing as interference (moiré) patterns, and on high-contrast
antialiased text (e.g. regular black text on white background appeared bold).
macOS notes
All Mac browsers tend to display the below images with incorrect gamma on the built-in MacBook displays, which makes the “bad” images look less wrong, and there are slight interference patterns on the “good” images. Please download the images and view them in the Preview app instead, which displays them correctly.
Time Quest

Good

Bad
Space Quest III: The Pirates of Pestulon

Good

Bad
Windwalker

Good

Bad
High DPI on macOS
The backstory: DOSBox Staging uses OpenGL output with the sharp bilinear scaling shader to keep the picture crisp no matter how big or small the image is, and minimise blurring on pixel transitions.
Due to the way macOS handles DPI scaling, the image was drawn at a much lower
resolution, usually just a quarter of the window size. Then it was stretched
by the system, producing an unpleasantly mushy presentation. But we want our
pixels to be so sharp they could cut one’s eyes 


Without high DPI support
With high DPI support
Now DOSBox Staging can handle high DPI displays, be it Retina or not, so you and shaders alike can see all the (physical) pixels.
Please note that this is currently experimental: only macOS is currently supported, and we haven’t thoroughly tested multi-display setups. Please report any weird behaviour! Support for Windows will come in the future, and for Linux, it is still uncertain. Also note that due to the way rendering is currently implemented, you may observe lowered performance on higher resolution displays, especially when running off integrated graphics. This might be remedied in the future as well.
Window transparency support
There might be situations where you want to place the DOSBox Staging window on
top of another window while seeing both windows at the same time. Indeed, you
can now set the DOSBox Staging window as transparent, with a customised level
of window transparency, so that you can see the background window as well.
There is a new config option transparency for this, whose valid values are
between 0 (no transparency; default) to 90 (high transparency).

Frame presentation modes
DOSBox presents frames when new content is available, which means that sometimes the effective frame rate can vary between 0 FPS (if the screen content isn’t changing) and as fast as the DOS vertical refresh (vblank) rate (typically up to ~70 Hz). We’ll call this presentation mode Variable Frame Rate or VFR.
In addition to VFR, DOSBox Staging supports a Constant Frame Rate (CFR) presentation mode, which presents a constant frame rate defined by the emulated DOS rate, as well as variations on both:
-
Synced CFR, which presents a constant frame rate but is synchronised with the host’s refresh rate. This presents only the most recently updated frame when the DOS rate exceeds the host rate.
-
Throttled VFR, which presents a variable frame rate up to the DOS rate throttled to the display’s rate. This presents only the most recently updated frame when the DOS rate exceeds the host rate.
By default, DOSBox Staging inspects runtime conditions and picks the optimal presentation mode.

Synced CFR mode selected due to vsync-enforced video drivers
Although typically not needed, power users might be interested in forcing a given mode or rate, which can be done using the following config settings (which includes detailed descriptions in the conf):
[sdl]
presentation_mode = auto | cfr | vfr
host_rate = auto | sdi | vrr | custom-rate

[dosbox]
dos_rate = default | host | custom-rate
DOS shell improvements
Piping from the DOS prompt or batch files
DOSBox did not support the piping operation previously, but DOSBox Staging now
brings piping support as how it has worked in DOS and most other operating
systems. This allows two or more commands to communicate by passing the output
text of one command to another as its input text. For example, commands like
ECHO Y | CHOICE will work, so that the Y option will be passed as the
input of CHOICE command. Chained piping is also supported, such as DIR |
SORT | MORE for displaying sorted directory output one screen at a time
(provided that you have the SORT and MORE commands from MS-DOS or FreeDOS
in your path). If the current directory and C:\ are both read-only, the
environment variable %TEMP% (or %TMP%) needs to be set within DOS pointing
to a writable directory so that piping will work properly (e.g. SET
TEMP=C:\TEMP).
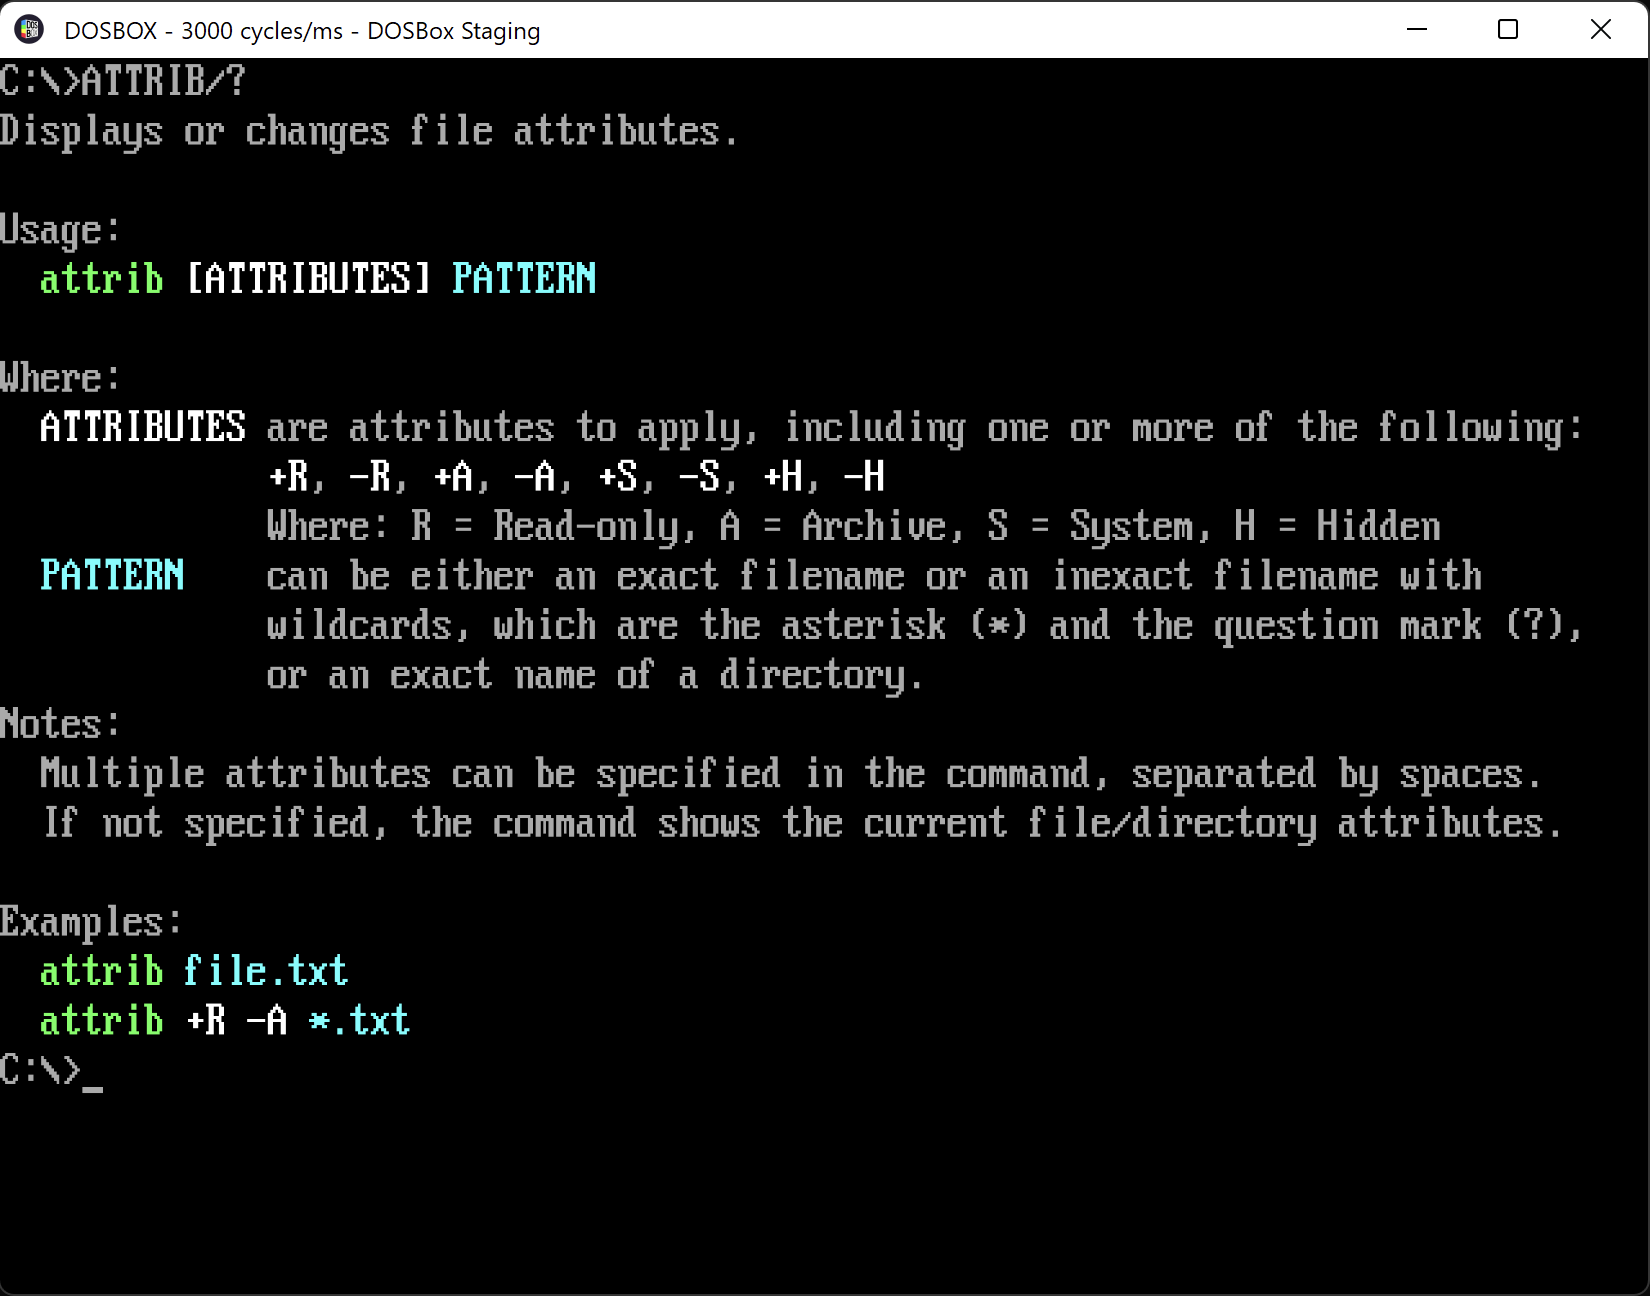
File attribute support and ATTRIB command
File attributes contain information about how the files should be used, and in
DOS these correspond to Archive (A), Read-only (R), Hidden (H), and
System (S) attributes. DOSBox Staging now adds support for file attributes
through ATTRIB command (type ATTRIB /? for more information about this
command) or through DOS API that accesses to file attributes. For example,
some game installers and applications make use of file attributes. All file
attributes are currently supported except for system and hidden attributes on
mounted local drives for non-Windows platforms.
Default choices for the CHOICE command
The CHOICE command allows you to choose from a list of options, but
sometimes you want to have some default choice if no selection is made within
the specific time period. DOSBox Staging now allows you to do this, by
specifying the /T option which includes a default choice and the time period
in seconds. For example, CHOICE /C:ABC /T:B,2 will default to the choice B
(among A, B, and C) if no key press is made within 2 seconds.
Mount improvements
Physical CD-ROM mount support
Mounting physical CDs is now (re-)implemented in DOSBox Staging for better compatibility with games like Under a Killing Moon, System Shock, and The Pandora Directive. The feature is supported in DOSBox SVN but was forced to be dropped from DOSBox Staging earlier during the SDL2 migration process. We’ve brought it back by using the SDL1 CD support code as an external library, plus restoring the main SDL CD interface from DOSBox.
To use the feature, execute the command mount -cd to list all CD drives and
their numbers, and use -usecd NUMBER parameter to specify a CD drive
NUMBER, just like you would do in DOSBox SVN. Playing CD audio tracks from
physical discs is also supported in Windows as with DOSBox SVN.

Read-only disk image mount support
You might have encountered the problem previously that you could not mount write-protected disk images, which happened simply because DOSBox Staging required write access to mount disk images.
Sometimes the user may also want to mount a disk image in a read-only manner
(so that the content in the disk image will not be changed inside the
emulator), even if the disk image itself is not write-protected. We have
realised that in either case the requirement for write access is not needed
for mounting disk images, so we have added support for mounting them in a
read-only manner, either when the disk image files are read-only or when the
-ro flag is specified by the users.
Z-drive customisation and directory support
The internal Z drive that is automatically mounted when you launch DOSBox
Staging is now fully customisable, allowing users to add their own files or
programs to the drive by putting them in the drivez subdirectory inside the
DOSBox Staging program directory. Files already existing on the Z drive will
be replaced by the user-provided ones, e.g. you can use your own MEM.COM or
KEYB.COM commands instead of the default ones on the Z drive. Moreover,
support for one-level subdirectories has been added, allowing users to better
organise their files, resulting in a cleaner-looking Z drive. The drive’s
contents can be refreshed via the RESCAN command to reflect any changes made
to it at the host OS level.
IMGMOUNT wildcard support
The IMGMOUNT command allows you to mount disk or CD images, but sometimes
you may want to mount multiple images to a single drive, swappable via a
keyboard shortcut. Previously you had to specify the names of the all the
image files one by one, even if they have some patterns in common (like
DISK1.IMG, DISK2.IMG, DISK3.IMG, etc). IMGMOUNT command now supports
wildcards for mounting image files, so that you can just specify a file
pattern that matches all the image files that you want to include. For
example, the command IMGMOUNT a d:\*.img -t floppy will mount all image
files with the IMG extension on D:\ as floppy images.

Automount of resource drives
Directories can now be automounted, provided the automount config setting is
enabled (which it is, by default).
These automount directories are single-letter directories, a through y
representing the mounted drive letter (where z is reserved for DOSBox’s
drive) placed inside a local drives/ directory, relative to the startup
location. This drives/ directory can also be placed in a scanned resource
location, like your DOSBox config directory or the release package’s
resources/ area.
Each drive can be customised with an accompanying <letter>.conf to define
its mount type, label, and path. For example, to mount a local
drives/d/ directory as a D: CD-ROM with the label SIERRA, the
accompanying d.conf would contain:
A bundled Y: automount is provided in the release’s resources/ directory
that bundles a couple FreeDOS 3rd party tools (XCOPY.COM, DELTREE.COM,
DEBUG.COM) along with an accompanying y.conf to add it to the PATH.
Note
This feature doesn’t yet support image mounts, such as .img, .bin/cue,
or .iso.
Localisation improvements
Code pages and keyboard layouts
The 20-year-old FreeDOS code pages (screen fonts) and keyboard layouts were updated to the latest versions, offering countless new definitions for use. See the full list in the following documentation:
Some notable examples:
-
KEYB bg 3021— sets a Bulgarian keyboard layout and code page, with Cyrillic characters encoded according to the MIK standard -
KEYB cz489 867— a so-called programmer keyboard layout (national characters available with Right Alt+0 - 9) for Czech and Slovak languages, with Kamenický character encoding - which was more popular than code page 852 -
KEYB de 858— German keyboard, code page with EUR currency symbol -
KEYB hu 3845— Hungarian keyboard, CWI-2 character encoding -
KEYB pl 668— code page specially designed for the Polish language; places national characters on the same positions as standard code page 852 (so it is compatible with current software and text documents), but preserves more table drawing symbols -
KEYB pl 667— Mazovia encoding for Polish language, used mainly by older business software
Country support for different date, time, and decimal formats
The display formats for dates, times, and decimals were previously fixed to
the United States style, but this is no longer the case with this new version.
Indeed, DOSBox Staging can now display date, time, and decimal formats
according to the system locale and country settings, and for example, in the
Canadian French locale (country code 2) the date and time will be displayed as
2002-10-01 12:34 instead of 10-01-2002 12:34p as displayed in the United
States locale (country code 1). There is a new config option country which
allows you to manually specify the country code for the date, time, and
decimal formats.

Canadian French locale

United States locale
Local language and keyboard layout detection improvements
On macOS and Windows systems, local languages now are more robustly detected and applied.
Note that these can still be manually set using the language and
keyboardlayout config settings when needed, or via the KEYB command as
mentioned above.
Input improvements
Mouse-wheel emulation
The built-in mouse driver now provides a wheel support for application aware of CuteMouse extensions; examples include Necromancer’s DOS Navigator and Mpxplay.
The original CuteMouse driver version 2.1 is also able to use the PS/2 mouse
wheel, just start it with CTMOUSE /o.
Serial mice emulation
Numerous serial (COM port) mice are now emulated:
- original Microsoft mouse with 2 buttons
- Logitech mouse, with 3 buttons
- wheel mouse with 3 buttons
- Mouse Systems mouse (old mouse type, not compatible with the ones listed above), with 3 buttons
To enable serial mouse, user the SERIAL 1 mouse command (this will attach it
to the COM1 port), or edit the [serial] section of the configuration file.
By default, DOSBox Staging tries to determine what kind of mouse the game or
application expects.
With serial mouse emulation, Windows 1.01 is finally usable!
Windows 3.1 seamless mouse integration
It is now possible to have a seamless mouse integration using one of the following 3rd party VMware-compatible Windows 3.1 mouse drivers:
-
VBADOS by javispedro — this one requires a corresponding DOS mouse driver to be started; this driver also provides seamless mouse integration for a real DOS if booted inside DOSBox Staging
-
vmwmouse by NattyNarwhal — does not require any specific DOS driver and has experimental support for mouse wheel, but current version 0.1 has stability problems
For now, only the mouse is supported (no VMware directory sharing, etc.), only using VMware protocol (no VirtualBox-only drivers). Windows 9x VMware mouse driver is not supported.
Joystick calibration hotkeys
Most DOS games that offer analog joystick control include some form of calibration. However, some games have poor or limited calibration resulting in the joystick’s position drifting or being offset, despite calibration attempts.
To compensate for these rare cases, DOSBox Staging lets you adjust the
joystick’s X and Y position parameters in real time by enabling the
use_joy_calibration_hotkeys setting in the [joystick] config section.
Once activated, you can tap Ctrl + arrow-keys or Alt + arrow-keys to adjust either the joystick’s scalar multiplier or absolute offset position, respectively. These let you “counterbalance” calibration issues in real time.
Each tap of the hotkeys will log the calibration values for the given axis. For example:
Once you’ve found the optimal settings for a game, the logged calibration values can be placed in the game’s local config file (so the setting are only active for the affected game). Using the above as an example:
[joystick]
use_joy_calibration_hotkeys = false
joy_x_calibration           = 0.576211,0.02
joy_y_calibration           = 0.5474,-0.005
Note that you can disable the calibration hotkeys once you’ve found settings that work for a problematic game.
Here’s a video showing how the calibration hotkeys “pull” the joystick in various directions:
The new joystick calibration feature in action
General improvements
Command-line setting of configuration options
Some people may want to temporarily run DOSBox Staging with specified config
option(s), and in this new version you can do this with the new -set
command-line option when launching DOSBox Staging, instead of having to modify
the configuration file before you start DOSBox Staging.
For example, the user can temporarily run DOSBox Staging with the EMS memory
disabled with the command line dosbox -set ems=false, overriding the setting
in the configuration file.
The -set option can be specified multiple times for different config
options, similar to the -c option which can be used multiple times to run
multiple commands after DOSBox Staging starts.
Windows installer for Windows users
Previously, DOSBox Staging was only available as portable zip packages for Windows users, but this has changed in this new version—as a Windows user you can now install DOSBox Staging more easily with the installer, which is especially recommended for new and first-time users. When the installer is used, the installation process will be automated while allowing you to change certain things like the installation folder, and you will be able to launch DOSBox Staging as soon as the installation ends. Shell context menus can also be automatically added for a faster launch of DOSBox Staging from Windows Explorer.

Windows installer welome page
![]()
Icons after installation
Configurable modem connect speeds
The soft-modem’s reported connect speed can be customised using the serial
port’s baudrate setting. for example:
Although this doesn’t change the underlying baud rate, it can help satisfy old modem software if it’s unable to handle (or parse) the larger connect values.
Handling options for memory faults in buggy games
Extremely rare programming bugs 😉 in some DOS games (and programs) may cause them to accidentally write data beyond their allocated memory region, similar to “painting outside the lines”. DOSBox is great at catching these instances: it flags the corruption and quits, preventing the program from barreling on and possibly doing more harm such as writing corrupt save games, documents, and so on.
DOSBox Staging defaults to this same behaviour, but adds the [dosbox]
mcb_fault_strategy config setting:
| mcb_fault_strategy | Behaviour | How it affects the buggy game |
|---|---|---|
deny |
Report and quit as soon as a fault is detected (default) | Game terminates, no risk of subsequent file corruption |
repair |
Report and repair up to 100 sequential faults | Game continues, but may still be unstable if its developers expected the corruption |
report |
Report the corruption and carry on | Game continues, but risks further instability and file corruption |
allow |
Carry on without reporting | Game continues, but risks further instability and file corruption |
Only consider this if your game is prone to crashing with MCB chain corruption errors reported in the console log.
Developer-related improvements
Self-documenting bit twiddling with bit_view
We’ve implemented a bit_view C++ class using constant expressions to access
a subset of a data-field’s bits, allowing them to be read, written, assigned,
flipped, cleared, and tested, without the need to for the usual twiddling
operations.
Constructing a bit_view is similar to a C bitfield, however unlike C
bitfields, bit_views are free from undefined behaviour and have been proven
using GCC’s and Clang’s undefined behaviour sanitisers.
There’s more detail and some code examples here.
Memory block and type size simplification
The emulated main memory (up to 64 MiB) and the video card’s memory (to up 8 MiB) are both now allocated statically to reduce pressure on heap storage (#1714).
More progress has been made in reducing the use of large variables type-sizes down to purpose-fit sizes per the DOS/hardware specification (typically 8 or 16-bit) (#1721).
Tracy profiler integration
The Tracy event profiler has been integrated into the build system and basic hooks are in place to log frames and tics. These are only active (and not compiled in) unless Tracy is enabled.
Here’s what it looks like:

Tracy runtime-profiling DOSBox Staging
It can be enabled at build-time with -Dtracy=true. Learn more about it, and
how to build the server-side component here: #1749
Continuous integration MSYS2 workflow improvements
The MSYS2-based workflow has been brought in line with current best practices, which dramatically improved its build time and lead to us now using it to generate the default Windows release binaries.
Release-package shell script
Release packages are now generated using a cross-platform POSIX-compliant shell script. With this logic moved into a script, developers can now easily test the creation of a release package locally, which was previously impossible as that logic only lived in a GitHub-syntax YAML.
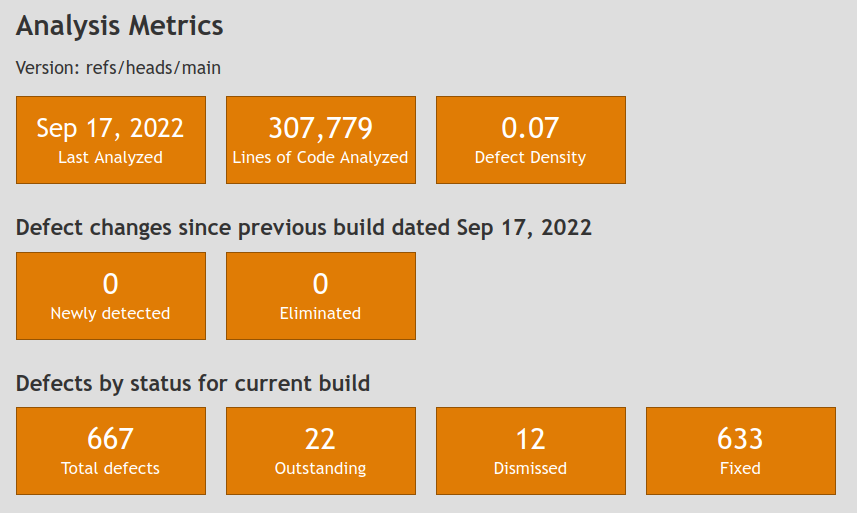
Static analysis
The team continues to fix and address static analysis issues as flagged by various analysers. Here are our Coverity Scan metrics to-date:

Translation status
- German: up-to-date
- Italian: up-to-date
- Polish: up-to-date
- Russian: config sections up-to-date
- French: not updated
- Spanish: not updated
The 0.79.0 configuration file is also in UTF-8 format for the German, Italian,
and Polish languages under the package’s
resources/translated-0.79-conf-files directory.
The messaging system now supports self-documenting markup syntax, which is much easier to read and maintain compared to the previous ANSI escape sequences.
| Old escape-code style | New markup style |
|---|---|
Escribiendo ^[[34;1mdir^[[0m all� mostrar� su contenido. |
Digita [color=blue]dir[reset] per visualizzarne il contenuto. |
Notable fixes
-
Fixed Ultima Underworld issues with gaming (high polling rate) mice (#1722)
-
Fixed lockups and input issues with the debugger on macOS and Linux. Note that for those using the debugger on Linux, we recommend building it with SDL 2.0.18, because some input/interaction bugs exist when using newer SDL versions.
-
Fixed colours becoming very dim on newer Intel integrated GPUs due to Intel’s OpenGL drivers not properly handling the sRGB linear colour space.
-
Fixed a memory-read race condition present during the splash-image display, which also reduced start-up time by around 200 ms.
-
Fixed display of the low-resolution halfline VESA 2.0 mode used by Extreme Assault through the addition of a new
vesa_modeconfig setting value, namedhalfline. -
Named the macOS application “DOSBox Staging.app” per the macOS per Human Interface Guidelines.
-
Fixed a usability trap door when opening the mapper without mouse support: in these cases, the user was unable to exit the mapper. The mapper now only opens when mouse support is enabled.
Special thanks
-
John Novak for all the audio enhancements, mixer cleanup, shader improvements, and code reviews
-
FeralChild64 for the mouse overhaul, code page and layout cleanup and improvements, and code reviews
-
Wengier for the shell improvements, mount and CLI additions, and Windows installer
-
Antti Peltola for providing historic resources, documentation help, and project support
-
shermp for the MSYS2 cleanup, cross-platform packaging script and CI cleanup, ANSI markup system, and code reviews
-
Kirk Klobe for the debugger fixes, Tracy integration, and paging and memory system refinements
-
GranMinigun for the HiDPI additions, video chain fixes, and Russian translations
-
nemo93 for testing 400+ games on the Raspberry Pi
-
Kappa971 for the Italian and configuration file translations, and leading the translation effort
-
Burrito78 for the German translation
Contributors
Maintainers
- kcgen
- John Novak
- FeralChild64
- shermp
- Wengier
Authors
- kcgen
- John Novak
- FeralChild64
- Wengier
- shermp
- Kirk Klobe
- GranMinigun
- Patryk Obara
- ripsaw8080 (DOSBox maintainer)
- NicknineTheEagle
- David Reid (dr_lib author, 3rd party dependency)
- Leandro Nini (libresidfp author, 3rd party dependency)
- Jonathan Campbell (DOSBox-X maintainer)
- Dean Beeler
- ripa (DOSBox patch author)
- Keenan Weaver
- Dennis Lühring
- IPeluchito
- Otto Liljalaakso
- Peter Ferrie
- arrowgent
- gulrak
- hunterk
Translators
- Burrito78 (German)
- FeralChild64 (Polish)
- GranMinigun (Russian)
- Kappa971 (Italian)
Sponsors
- Antti Peltola: 3,000 USD during the 0.79 development cycle
- Wengier
Backers
- Burrito78
- Hugo Locurcio
Thank you to our financial contributors who allow us to purchase hardware, licenses, and other non-trivial expenses to keep the team and project going.
To support our work, donate to our GitHub Sponsors or Open Collective.
Thank you
We are extremely grateful for all contributions, including the invaluable improvements merged in from the DOSBox project.